

If you're looking for an efficient and cost-effective way to mill your logs, then you should definitely consider using a chainsaw. This handy tool can be used for a range of tasks, including milling lumber quickly and easily. In this article, we'll provide you with the ultimate guide on how to effectively use a chainsaw for milling.
Step 1 – Choosing the Right Chainsaw
The first step in any successful milling project is selecting the right chainsaw. When it comes to chainsaws, size matters! A larger saw will help you get through larger logs more quickly and efficiently. It's also important to consider the type of blade you have; make sure it's sharp enough to cut easily through the wood without becoming dull too quickly. And lastly, always choose a saw that is comfortable for you as well as powerful enough for your job.
Step 2 – Preparing Your Logs
Once you've chosen your saw, it's time to prep your logs. Start by marking out where you want the cuts to go and then cut around this line with your saw; this helps ensure that your cuts are precise and accurate while also preventing kickback when making deeper cuts later on. Additionally, make sure that all of your logs are free from debris such as dirt or twigs before starting any cutting process; this will help keep your saw blades clean and free from damage while also ensuring better accuracy during cutting.
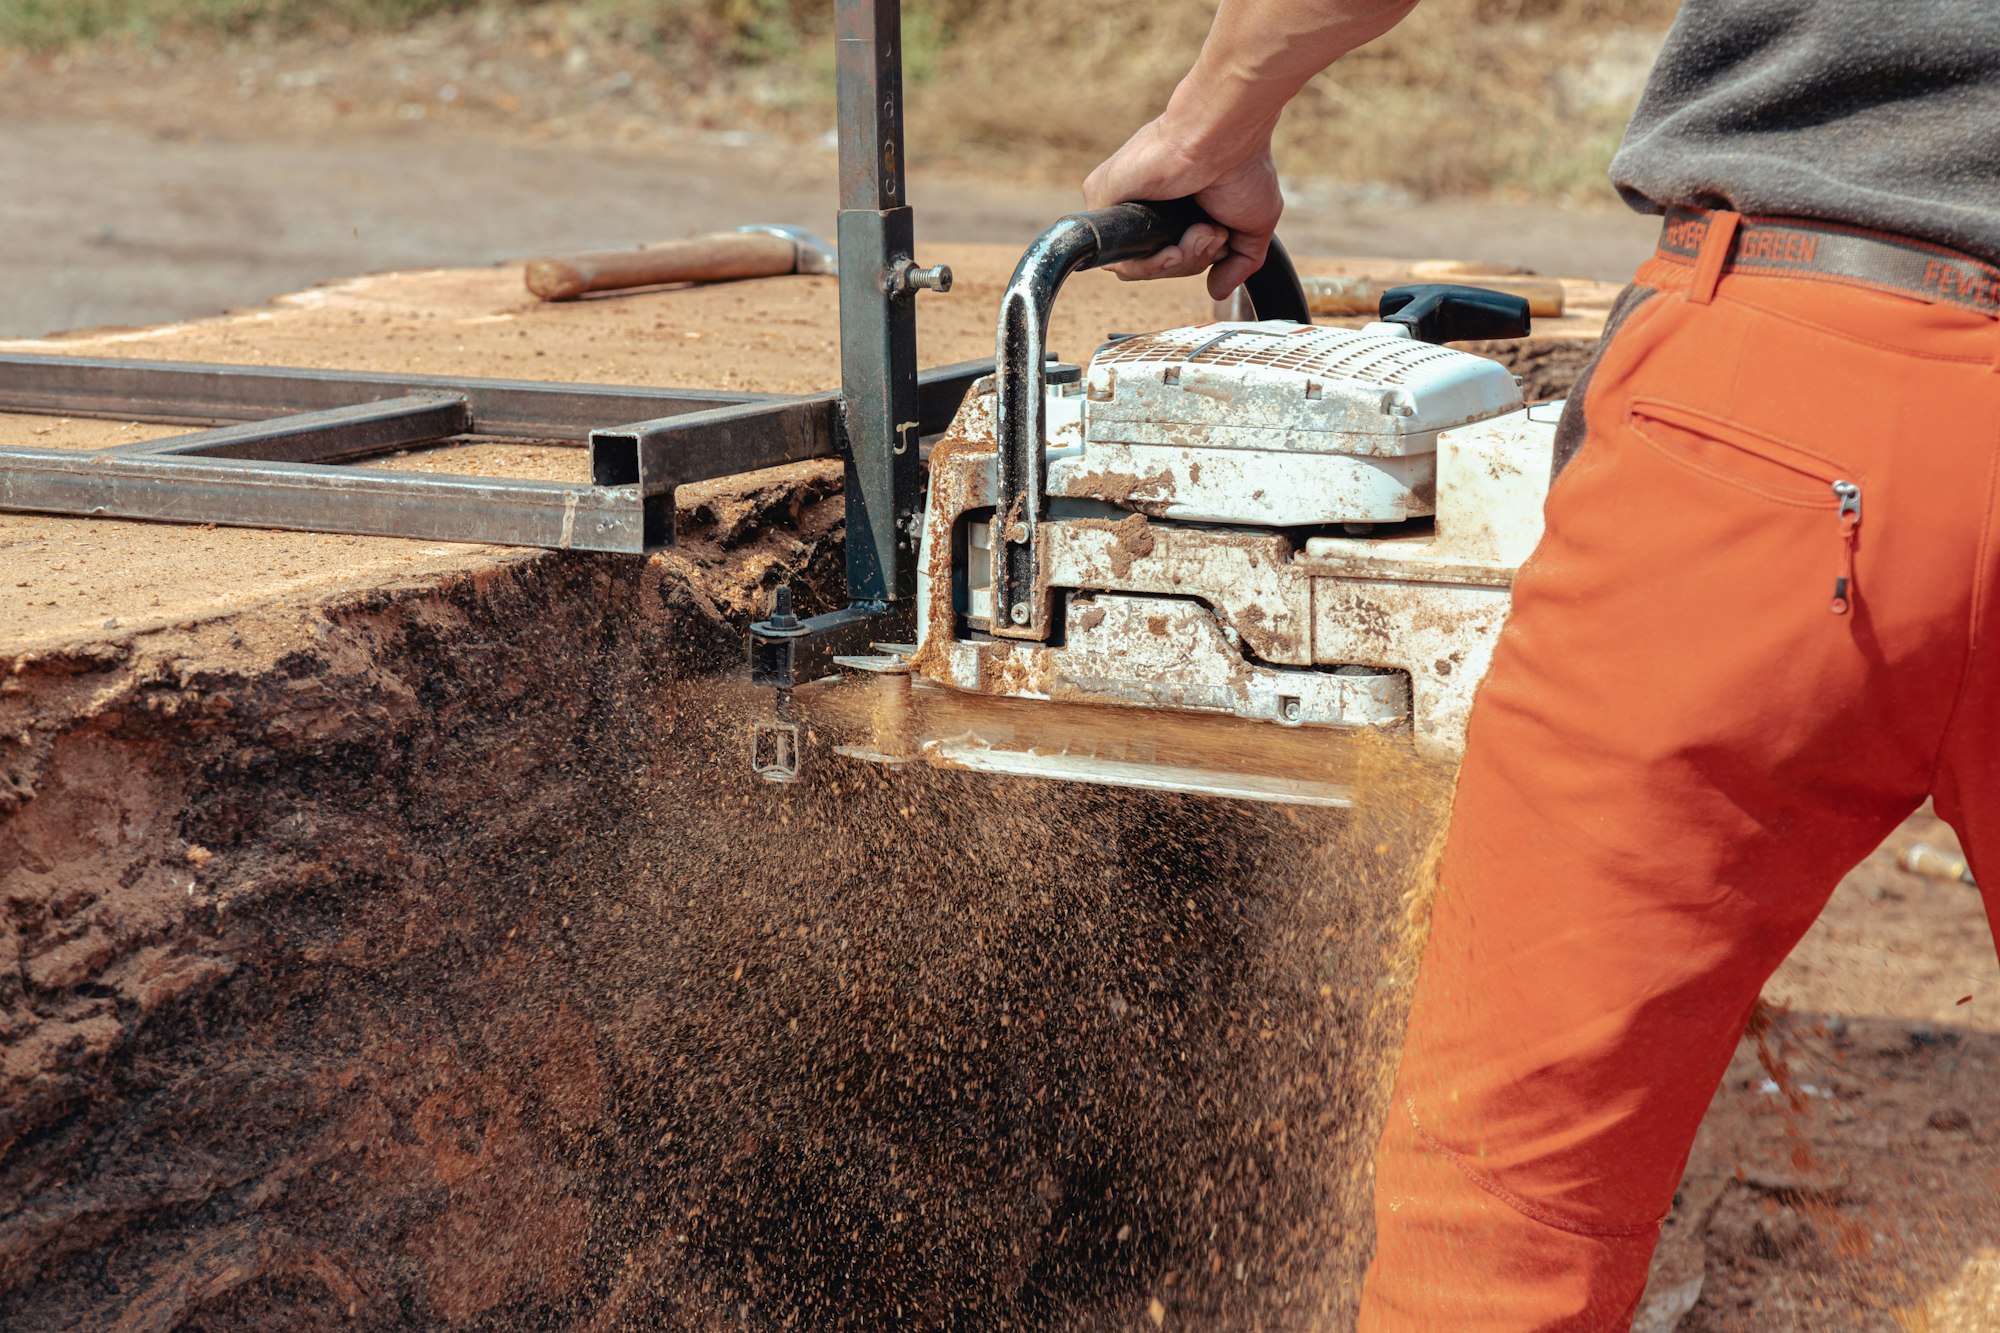
Step 3 – Making Your Cuts
Now that your logs are ready and prepped, it’s time to start making some cuts! Start by setting up a flat surface where you can safely place your log while operating the saw – either on the ground or on top of a sawhorse works great here. Then take steady passes along each of your lines until the desired depth has been achieved; be sure not to rush through these passes as doing so may result in uneven cuts or even worse, kickbacks which can cause serious injuries if not done properly.
Final Thoughts:
Milling with a chainsaw is an effective way of getting quick results without needing special tools or equipment. By following our guide above, you'll be able to prepare and mill any kind of log in no time! Just remember to select a suitable chainsaw for the job at hand, prep all of your logs properly before beginning any cutting processes, and take steady passes when cutting with the saw - all these steps combined will help ensure that each cut is precise and accurate every single time! With just a little bit of practice, soon enough you'll become an expert at milling with a chainsaw!
Carmyra Portable Chainsaw Mill 36" Inch Planking Milling Bar Size 14" to 36"

Granberg Chain Saw Mill, Model# G777

VEVOR Portable Chainsaw Mill Planking Milling Aluminum Steel with Installation Tools for Builders and Woodworkers (14" to 36")
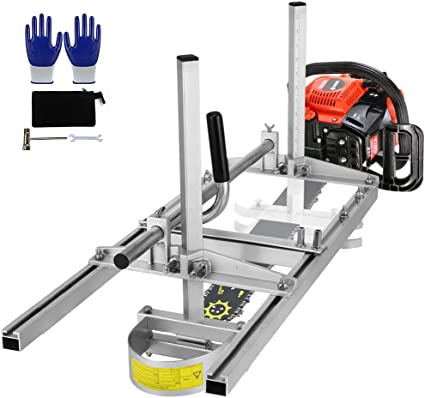
VEVOR Portable Chainsaw Mill Planking Milling Aluminum Steel with Installation Tools for Builders and Woodworkers (14" to 36")
FAQs
What is milling with a chainsaw?
Milling with a chainsaw is a unique process of cutting down large pieces of wood or other materials into boards, planks and other smaller pieces. It is done using a special type of chainsaw which has specially designed blades for cutting the material accurately and quickly. The saw is mounted onto an adjustable beam, allowing it to move freely in any direction while following a predetermined pattern.
When milling with a chainsaw, safety is always important as the saw can be incredibly sharp and because the movement involved can be unpredictable at times. Proper protective gear such as gloves, goggles and hearing protection should be worn when operating the saw. In addition to this, it’s recommended that you use anti-kickback guards and chain brakes while milling with your chainsaw to minimize kickbacks and reduce accidental injury or damage.
Professional quality results are achievable depending on what material you're cutting; However many people also find themselves doing DIY projects such as making tables or benches from large tree trunks using their own chainsaws for milling purposes! Milling with your own chainsaw may take more time due to lack of experience but you'll achieve stunning results at home if done properly.
2. How do I mill with a chainsaw?
Milling with a chainsaw is not an easy task, but it can be done with the right knowledge and expertise. The basic idea behind milling with a chainsaw is to use the saw's chain for cutting instead of the standard sides of the blade. This type of milling is often referred to as “rip-cutting” because instead of using a steady and continuous cut from side to side you are making intermittent cuts along the length of whatever material you are working on.
To begin, start by selecting your timber that will serve as your workpiece – preferably something straight-grained without knots or knots that have been planed away if possible. Next, set up your chainsaw so that it has ample clearance around each edge and surfaces when in operation; this will allow plenty of room for any chips or shavings created during cutting process. To reduce kickback while still leaving enough room to maneuver safely, adjust the depth gauge setting so that only one-third (or less) of its length enters into contact with wood fibers at all times. Finally, mark out where you want to make your cuts and make sure they line up correctly before proceeding further.
Now comes time for actual cutting! Start off first by choosing proper filing angle; some experienced individuals suggest angles between 10-15 degrees whether running clockwise or counterclockwise depending on grain direction in order achieve best results when ripping pieces apart. At this point if possible try using specialized grinding attachments designed especially for use with saws such as Stihl Razor Edge Pro Raker Chain Files which can help save time otherwise spent manually filing teeth down individually yourself – though care must still be taken regardless when attempting mills since even slightest slips could lead devastating consequences quickly snowballing out control due gradual force overtime generated over friction area created between blade’s path/surfaces being cut through so take extreme caution! Once finished prepping everything properly then proceed slowly yet steadily ensuring stay focused throughout entire operation keep maintaining steady pressure being applied onto workpiece until desired end result achieved - may need several attempts get perfectly symmetrical rip depending upon skill level current setup conditions used but eventually once feels comfortable enough having honed craft satisfaction derived from seeing own handmade creations come life will prove well worth effort put forth :) Good luck fellow lumberjack/millworker…may success always follow ya!
3. What are the benefits of milling with a chainsaw?
Milling with a chainsaw is cost-effective and efficient. It's a great way to cut large pieces of wood into smaller, more manageable sizes for use in furniture or other projects. Here are just some of the benefits that come from milling with a chainsaw:
- Cost savings: Milling with a chainsaw costs much less than using specialized equipment like sawmills or CNC machines, making it appealing for anyone on a budget looking to get the job done quickly and cheaply.
- Versatility: You can use your chain saw to create boards, beams, posts, planks and many other shapes simply by adjusting the guide bar length you’re using for cutting. This makes it very versatile when compared to other mills which can require different attachments depending on the shape you need to create.
- Quicker production time: Since chain saws are already set up for quick cuts through wood material they make an ideal tool when it comes to reducing production time as even larger pieces of wood can be easily milled in short order due to their fast speed and high power capability.
4 Improved timber quality: Since chain saws offer precise control over cuts they allow you more opportunity to adjust patterns in order increase timber strength as well as improve its aesthetic appeal too - something which may not be possible if done manually with hand tools instead of power tools such as this one!
Overall, milling with a chainsaw offers many advantages over traditional methods - from cost savings and versatility all the way through faster production times and improved timber quality - so don’t forget about utilizing this powerful tool next time your project requires detailed cutting work!
4. How do I add people to my milling with a chainsaw workspace?
Adding people to your milling with a chainsaw workspace can be done simply and safely if you take the right precautions.
Before adding any new members, it is essential to ensure that everyone involved has had adequate safety training on how to use the saw safely. Make sure they understand all of the important safety rules and regulations before they begin work in your space.
Once everyone is adequately trained, you should make sure that there are enough tools for everyone and assign them specific tasks related to the job at hand. This will help make sure that everybody is sufficiently engaged in what needs to be done instead of idly waiting around or having too many people performing redundant roles. It's also important that clear instructions are given so each person knows exactly what their individual contributions should be throughout each stage of production.
The most important thing when managing a milling with a chainsaw workspace is ensuring proper communication between team members by holding regular meetings, assigning responsible individuals for various tasks, setting achievable goals, following up on progress made (as well as any obstacles encountered), and providing clear guidelines which must be met while working on projects within said environment. Ultimately this helps avoid mistakes or oversights as well as provides an opportunity for gaining feedback from those involved as issues arise. As long as all parties remain committed to implementing these protocols correctly then adding people into your milling with a chainsaw workspace need not pose much risk or concern at all!
5. How do I create a milling with a chainsaw channel?
Creating a milling with a chainsaw channel is one of the most intricate ways to shape wood. It involves using a high-powered and specialized chainsaw to create intricate, often curved cuts that can give wood items exquisite aesthetic elements and greatly increase their structural integrity.
The process starts by selecting the right type of chainsaw for your needs. While many do-it-yourselfers think that almost any kind of chainsaw will suffice, this is not true. The optimal type of saw for milling would feature an engine with at least 3hp or more, preferably 5hp or more, depending on what types of materials you plan to cut and how much power you need to push through them in order to maintain control over the cuts made.
Next consider safety features such as chain guards, anti-kickback systems, full face shields and vibration dampening handles as well as accessories such as extended tethers (if needed) designed exclusively for milling operations with a chainsaw. Once you have your ideal saw it's time to actually begin cutting into your material!
The key here is accuracy: you must be precise in where you place the blade so that all pieces fit correctly when put together later on–be it a log cabin frame or other such structures typically milled from large logs using these techniques–or whatever other projects require precision designs carved from blocks of wood using a chainsaw. To do this accurately mark out exactly where deep grooves should go before beginning the actual cutting process; be sure these marks are visible even after filing down afterwards so they serve as guides when matching up components to complete your object later on without fail!
For each cut use smooth yet firm strokes while gradually adapting pressure if needed; attempting too much speed will cause kickbacks which could potentially injure both yourself & others nearby - take things slow & steady until everything has been cut according to specification ensuring success every single time! As always wear proper protective gear whenever operating any kind of power tools including but not limited too goggles/glasses plus hearing protection along with sturdy footwear – stay safe out there!
6. What are milling with a chainsaw bot commands?
Milling with a chainsaw bot is the process of cutting or shaping wood, metal, or other materials used in construction and fabrication projects. It typically involves using a motorized tool equipped with an abrasive chain that operates at high speeds to cut through materials.
The term “bot” refers to the automated nature of these tools which are programmed to cut with precision and accuracy. The commands for milling with a chainsaw bot can vary from device to device but may include instructions such as start, stop, pause/resume, adjust speed/feed rate, select tooling type (end mill vs router bit), specify dimensions (depth/width), etc.
In addition to the physical commands required for telling the machine what cuts need to be made and how deep they should be cut into each material being processed, there are also additional programming settings related to safety protocols and harnessing power accurately in order ensure smooth operation during milling processes. For example: Cutting depth per pass; spindle speed; coolant settings; ramp-up time before cutting begins; updated run-time temperatures based on current ambient environment temperature levels - all must be monitored and adjusted accordingly when needed.
Beyond just typical commands associated with operating a chainsaw bot safely and efficiently within industrial environments – there is an entire realm of patent software available that allows users even more precise control over their machines as well as access detailed data analysis about past production outputs for continuous improvement efforts related specifically towards optimizing workflows overall – resulting in greatly improved throughputs while reducing lead time dramatically!
7. How do I set up a milling with a chainsaw bot?
Milling with a chainsaw bot is an automated machining process that uses a robotic arm to mill materials. This process requires a complex set of commands, which can be divided into three categories: positioning commands, cutting/drilling commands, and safety/maintenance commands.
Positioning Commands: Often referred to as "teach points", positioning commands involve operating the chainsaw bot's robotic arm to set positions that are required for the machining process (e.g., setting an origin or changing a tool centre point). These commands are fundamental in determining the accuracy of the job being done.
Cutting & Drilling Commands: The most important part of any milling project is executing precise cuts or drill holes within predetermined dimensions. In order to achieve this goal, chainsaw bots require detailed instructions regarding speeds, depths, how many passes should be made at each step and feed rates for both roughing and finishing operations.
Safety & Maintenance Commands: Safety is paramount when using any type of machinery - especially one involving sharp objects! To ensure optimal performance from your machine it’s essential that you familiarize yourself with all relevant safety protocols including power-on procedures and machine maintenance guidelines such as coolant levels and oil changes. All these tasks require specific programming instructions based on your specific equipment setup.
The exact milling with a chainsaw bot command set necessary will vary slightly depending on make and model but generally speaking they will include some combination of teach points, cutting & drilling code as well as safety & maintenance protocols - working together they form the foundation upon which successful automation projects are built!
8. What are some of the best milling with a chainsaw tips and tricks?
Milling with a chainsaw is an important skill for anyone who needs to shape wood quickly, efficiently, and accurately. With the right techniques and a bit of practice, it is possible to produce precise, smooth surfaces on even the toughest types of timber.
First and foremost, it’s important to invest in the right type of chainsaw – one that has enough power and weight capacity to handle milling tasks. Also look for a chainsaw that will enable accurate depth control; some models come with adjustable depths settings so you can safely adjust how much material will be removed from the work piece. The saw should also be equipped with safety features such as chain brakes or guards which prevent kickback when milling tough woods like oak or pine.
Next up is choosing the correct chain for your saw – one designed specifically for milling applications. Look out for chains with deep cutters that are closely spaced together along their length – this helps ensure smooth cuts without tear-outs or chipping while creating uniform grain patterns all over the surface being milled. Additionally, using sharpening stones regularly will help keep your saw running at optimum performance levels while reducing wear and tear on both blade and engine alike!
When starting off each cut make sure you stay focused throughout - line up both edges of your board against a solid fence guide that runs parallel with your cut line until it reaches beyond where you plan to finish cutting (this gives you extra stability). Start off slowly at first until more experience has been gained -chain tension needs adjusting depending upon how fast/deeply you want to cut into timber too so don’t forget this essential step!
Protect yourself from dangerous pieces flying around by investing in protective gear such as safety glasses/goggles, socks & boots etc., plus always try not pressurize yourself too much during cutting sessions - take regular breaks if needed in order keep sharpness in focus whilst maintaining accuracy & precision levels high! Lastly but not least remember it takes time & dedication before becoming an expert due diligence need mastering skills sets required: patience pays off here!