
If you’re looking for a unique way to spruce up your home decor, adding a white wood trim accent wall is the perfect solution. With just a few basic tools, some time, and a bit of patience, you can create an eye-catching addition to any room that will be sure to impress your family and friends. Let’s go through all the steps necessary to build your own white wood trim accent wall!
Gather Supplies and Tools
The first step is to gather all of the supplies and tools you need for the job. You will need wood trim (preferably pre-primed), staple gun, finishing nails, chalk line, level and measuring tape. You may also want to have some painter’s tape on hand for fine adjustments or last minute touch-ups.
Create Your Template
Once you have all your supplies ready to go, it’s time to start creating your template. Use the measuring tape and chalk line to map out where each piece of wood trim will go on the wall. Remember that accuracy is key here so take your time and measure twice! Once everything is marked out correctly you can begin cutting each piece of wood trim with a miter saw or jigsaw.
Attach Your Trim Pieces To attach each piece of trim onto the wall use either finishing nails or staples depending on what type of material you are working with. Make sure that each piece of trim is securely attached by checking it with a level before moving onto the next one. If any pieces don’t fit correctly simply remove them and adjust accordingly until they do fit properly.
Finish Touches Finally, when all the pieces are attached it’s time for some last minute touch ups like painting or adding accents such as wainscoting or crown moulding if desired. Once everything looks perfect your stunning white wood accent wall should be complete!
Final Thoughts:
Building a stunning white wood trim accent wall can be an intimidating task but with just a few simple steps anyone can do it! All that’s left now is for you to pick up some supplies and start building - good luck! With just a little bit of patience and hard work you can create an eye-catching addition in any room that will be sure to wow family and friends alike!
PRICE
Varies
TIME
Varies
DIFFICULTY
Medium

Think about it. Every model home in the history of model homes has beautiful millwork and accent walls throughout.
Even adding simple trim can turn the most boring, builder-grade spaces into gorgeous, interesting masterpieces.
The other great thing about accent walls? They are generally pretty cost-effective.
Sure picture frame molding and wainscoting can get pricey, but a simple geometric accent wall probably won’t break the bank.
Alright, let’s start DIYing!
TOOLS
WHAT YOU’LL NEED
- Woodgrain 1/2 x 3/4″ wood pine moulding
- Paintable caulk
- Wood filler
- 150 and 220 sanding block or paper
- Paint
STEP 1: MEASURE + PLAN
Want to make a statement in your home? Accent walls are the way to go! First, get out that measuring tape—you'll need it for planning. Get all of the necessary measurements like height and width plus any outlets or other objects you may have to work around. If baseboards aren't going anywhere, factor them into those heights starting from top-to-bottom rather than floor-to ceiling. Now's when you let those creative juices flow: pick a pattern or color combo perfect for bringing life to your living space!
If you're ready to make your mark on the world and want creative décor that’s sure to stand out, then it's time for a geometric pattern wall!
Before getting started with any tools or materials, be sure to jot down precise measurements at different points along the wall. Remember - no two walls are created equal (as we all quickly learn). Style what you create can depend highly upon these details.
If designing something more intricate than just simple tape lines is desired; SketchUp offers a free version while Illustrator has an easy-to-use trial program if needed only once or twice. With either option, designer status awaits!
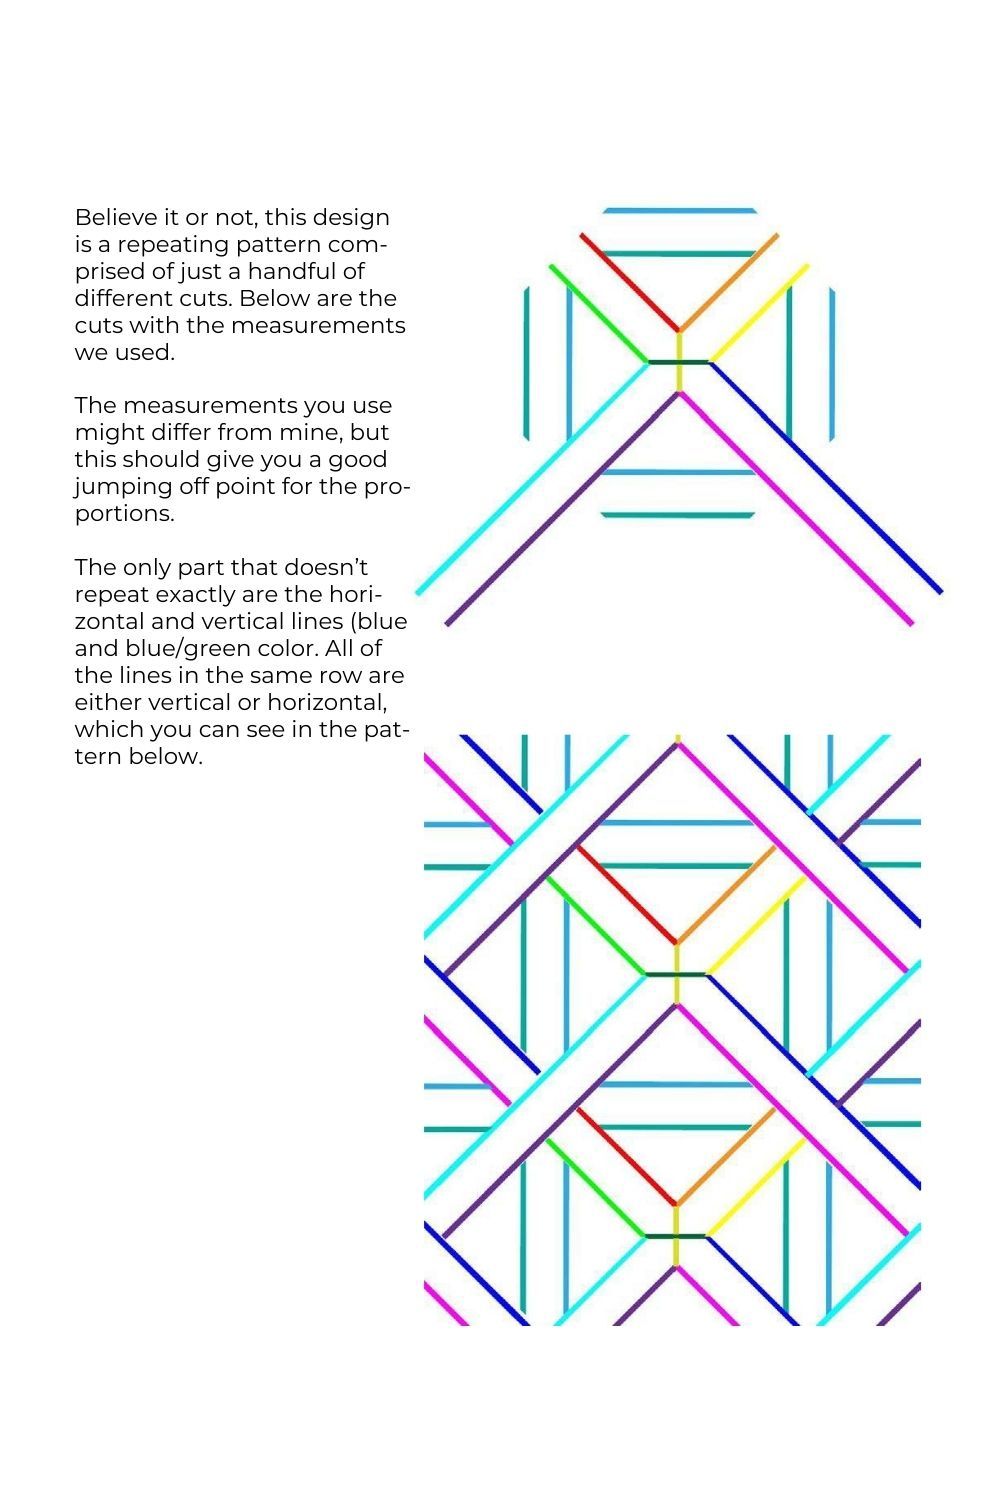
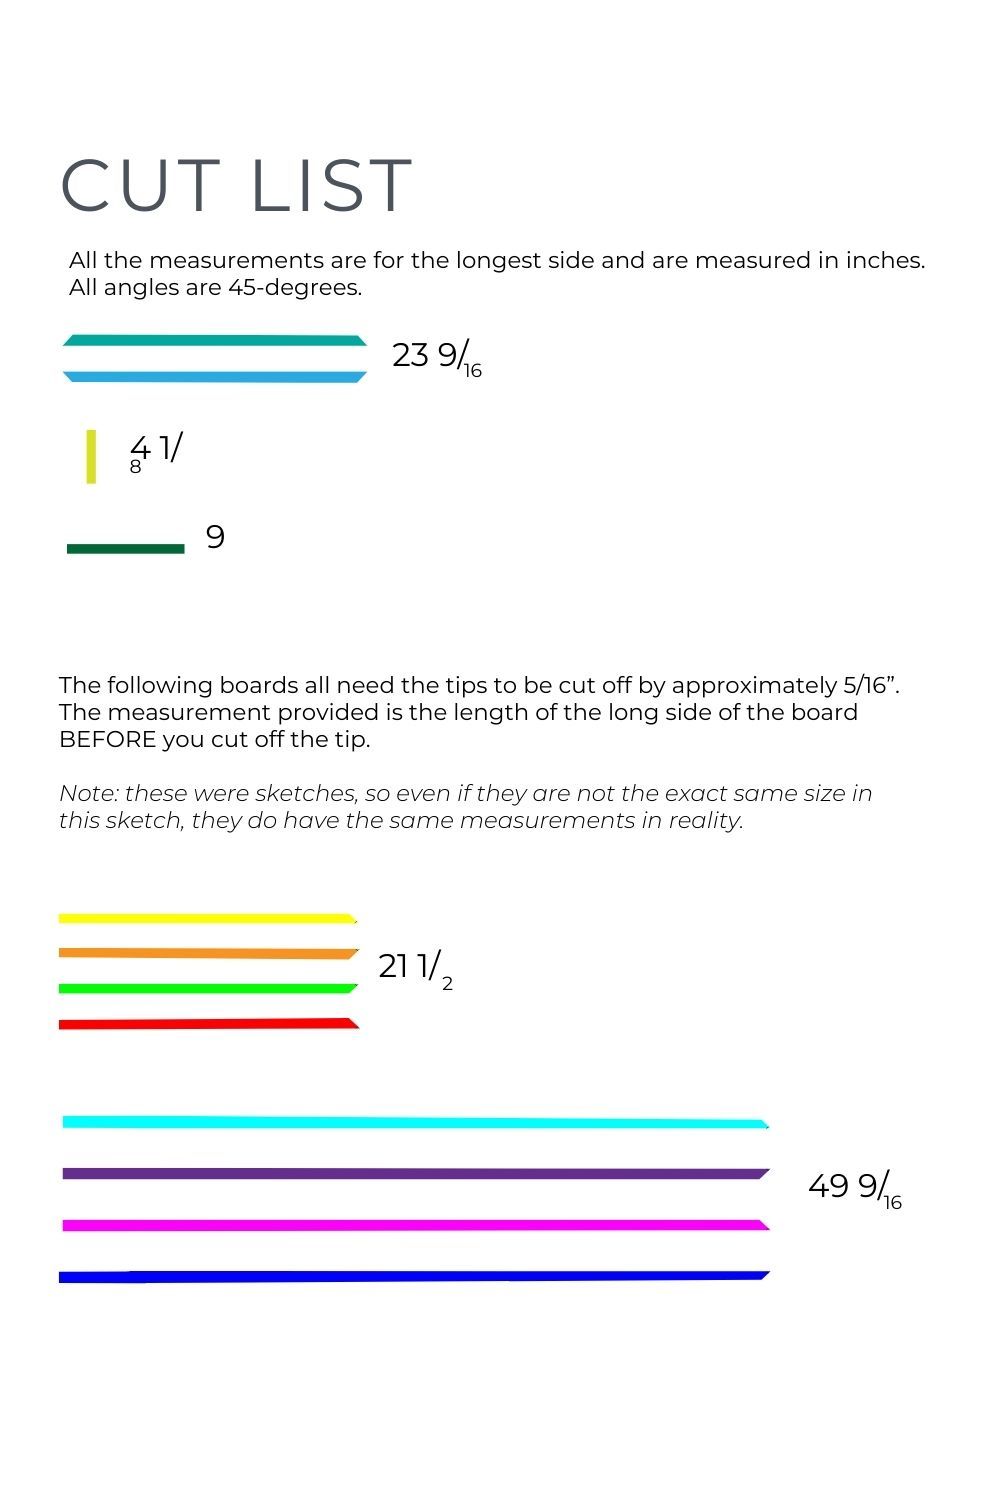
If you like our pattern, we put together a free cut list complete with our measurements and the direction of every angle. Yay for saving time and brainpower! Grab it at the bottom of this post.
STEP 2: MARK YOUR STUDS
Find and mark your studs from floor to ceiling. You want to hit a stud any chance you get, so it’s important to know exactly where they are without guessing.
I like to use the stud finder to mark a few spot along the same stud and then connect them using a spare board.

Pro tip: It’ll show your marks while you need them and then you can easily erase it before painting. No more struggling to cover pencil marks!
STEP 3: CUT THE FIRST FEW PIECES
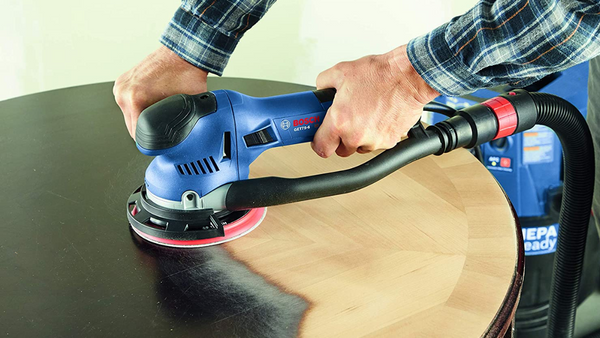
Power up your miter saw and start cutting. We like to use our Diablo 80 tooth saw blade for cutting thin wood trim like this. It’ll leave you with a nice, clean-cut and no splintering.
I know you’re excited, but don’t try to cut all your pieces right off the bat. Like I mentioned earlier, walls tend to not be perfectly square, so you’ll probably have to make a few adjustments to your measurements.
If your design is symmetrical, I recommend starting from the center and working your way out in each direction.
STEP 4: INSTALL
Double and triple-check your measurements for this first board. Put it in place and check to make sure it’s level.

Once it is, secure it to the wall using a few nails (the longer the board, the more nails you’ll want to add). We generally add one on each end and then one every 8-16″.
Using construction adhesive to secure your wood trim panels sounds like a great idea - until you want to switch up the look of your accent wall. Then, try removing glue from drywall with no damage! A near-impossible task that likely means replacing or heavily repairing what’s already there. Save yourself future headaches and skip this sticky solution!
Since these boards are so light, it’s okay if you don’t hit a stud every time.
If your nails are wobbly, don't just take it lying down! Get creative and cross-nail them for an extra secure hold. Add a nail at a slight angle then add another perpendicular to the first one - double trouble that'll ensure they're not budging any time soon!
And remember, when you caulk the sides of the boards, the caulk will help to secure them into place, so it’s okay if they are a little loose.
STEP 5: REPEAT
Continue cutting and installing until your entire design is up.
When crafting the perfect design, don't take any risks! Cut your pieces a bit bigger than necessary so you can easily make them smaller if needed - surely beats trying to stretch it out and run into trouble.
You Got This!
Having precision angles can make or break a design, so it's important to check each and every board. Thank goodness most levels come equipped with an angled level just for 45-degree cuts - making sure your designs look perfect has never been easier!

P.S. we highly recommend keeping your design to 90 and 45-degree angles. Since you can use the level, you rarely have to measure to make sure your placement is right.
If you start to put up a board and one of the trim pieces is sticking out a lot further than another, you can place a wood shim underneath the lower side to raise it up until it’s flush with the piece that was sticking out more.
You don’t have to worry about it having more of a gap on the sides of the wood trim since we’ll be hiding those seams with caulk in the next step.
STEP 6: CAULK
The next three steps are so often overlooked, but they are what are going to take your accent wall from “that’s nice” to “wow, who did you hire to install this?!”
If you’ve never caulked before, this video will walk you through how to cut the tip off your caulk, how to load the caulk gun, and how to actually caulk.
You’re going to add caulk to the side of every board. It’ll cover up any gaps between the wall and your trim.
What’s funny is that you might not even see a gap, but if you skip caulking, the gap will suddenly be very obvious when you paint!

Don’t worry about the gaps between the two trim boards, we’ll get to that in a minute.
When I’m caulking, I like to work in 2-minute increments.
I’ll run a bead of caulk along the seam between the wall and the trim for as many pieces as I think I can smooth in under 2 minutes.
Then I wipe my finger on a baby wipe to get it damp and run it along the caulk. You can also dip your finger in water, but I’m a fan of baby wipes since you can also use them on the wall if you accidentally get caulk somewhere it shouldn’t be.
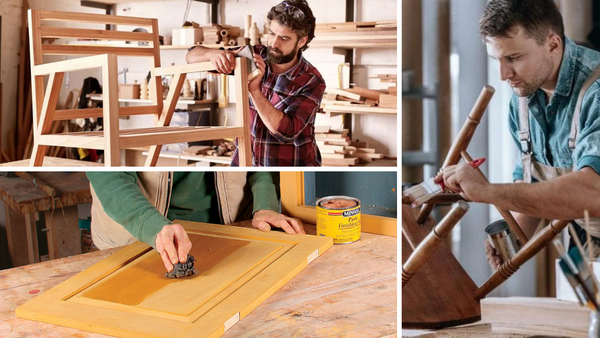
STEP 7: WOOD FILLER
Want to know the secret of solving all your home improvement woes? There's a simple rule you need to remember: when it comes time for those dreaded touch-ups, caulk will be your best friend when sanding won't do - think places like where walls meet trim. For everything else reach for that trusty wood filler and get back in business!
Installing trim boards in your home can spruce up the aesthetics, but it's important to fill any cracks or holes you might come across.
When two pieces of trim meet together, don't forget to add some wood filler for that extra bit of finesse! Besides mending gaps between boards, make sure not to neglect those pesky nail holes either - apply a generous helping and watch as they beautifully disappear before drying.

STEP 8: SAND
Once the wood filler dries, sand the seams until they are flush and any excess wood filler is gone.
STEP 9: WIPE THE SURFACE
Get off any dust from sanding. I like to vacuum and then run a tack cloth over the surface to make sure everything is up.
STEP 10: PAINT
Tape your sides up and start painting!
Start by cutting in and painting the sides of the trim boards, then use a roller on the flat surfaces.
Work in sections. Don’t do all the cutting in and then go back and roll. If you do this, you might end up with paint globs.
Instead, cut in on a smaller section then go back over with a roller while the paint is still wet.

We ended up quickly taping the sides and then going back and touching up the wall on either side rather than spending more time taping upfront. It’s a lot of nooks and crannies!
Between coats, sand with 220-grit sandpaper or a sanding block for an extra smooth finish. Don’t forget to wipe off any dust you might have created before your second coat!
Note: If you don’t want to spend much time taping, you might want to consider painting at least the edges of the wall and the edges of any of your wood trim that touch the wall before installing.

WHAT ABOUT TEXTURED WALLS?
Accent walls are a great way to add some flair and personality to your home, but they don't always look the best on textured walls.
That said, if you're willing to put in a bit of effort it can still be done! One option is adding trim right over the texture - just make sure any seams between boards or panels get covered with moulding for added neatness.
Alternatively, you could opt for covering up that wall texture before starting out on decorating - this works especially well if larger sections need sprucing up as individual panels will prevent messy joints from appearing.
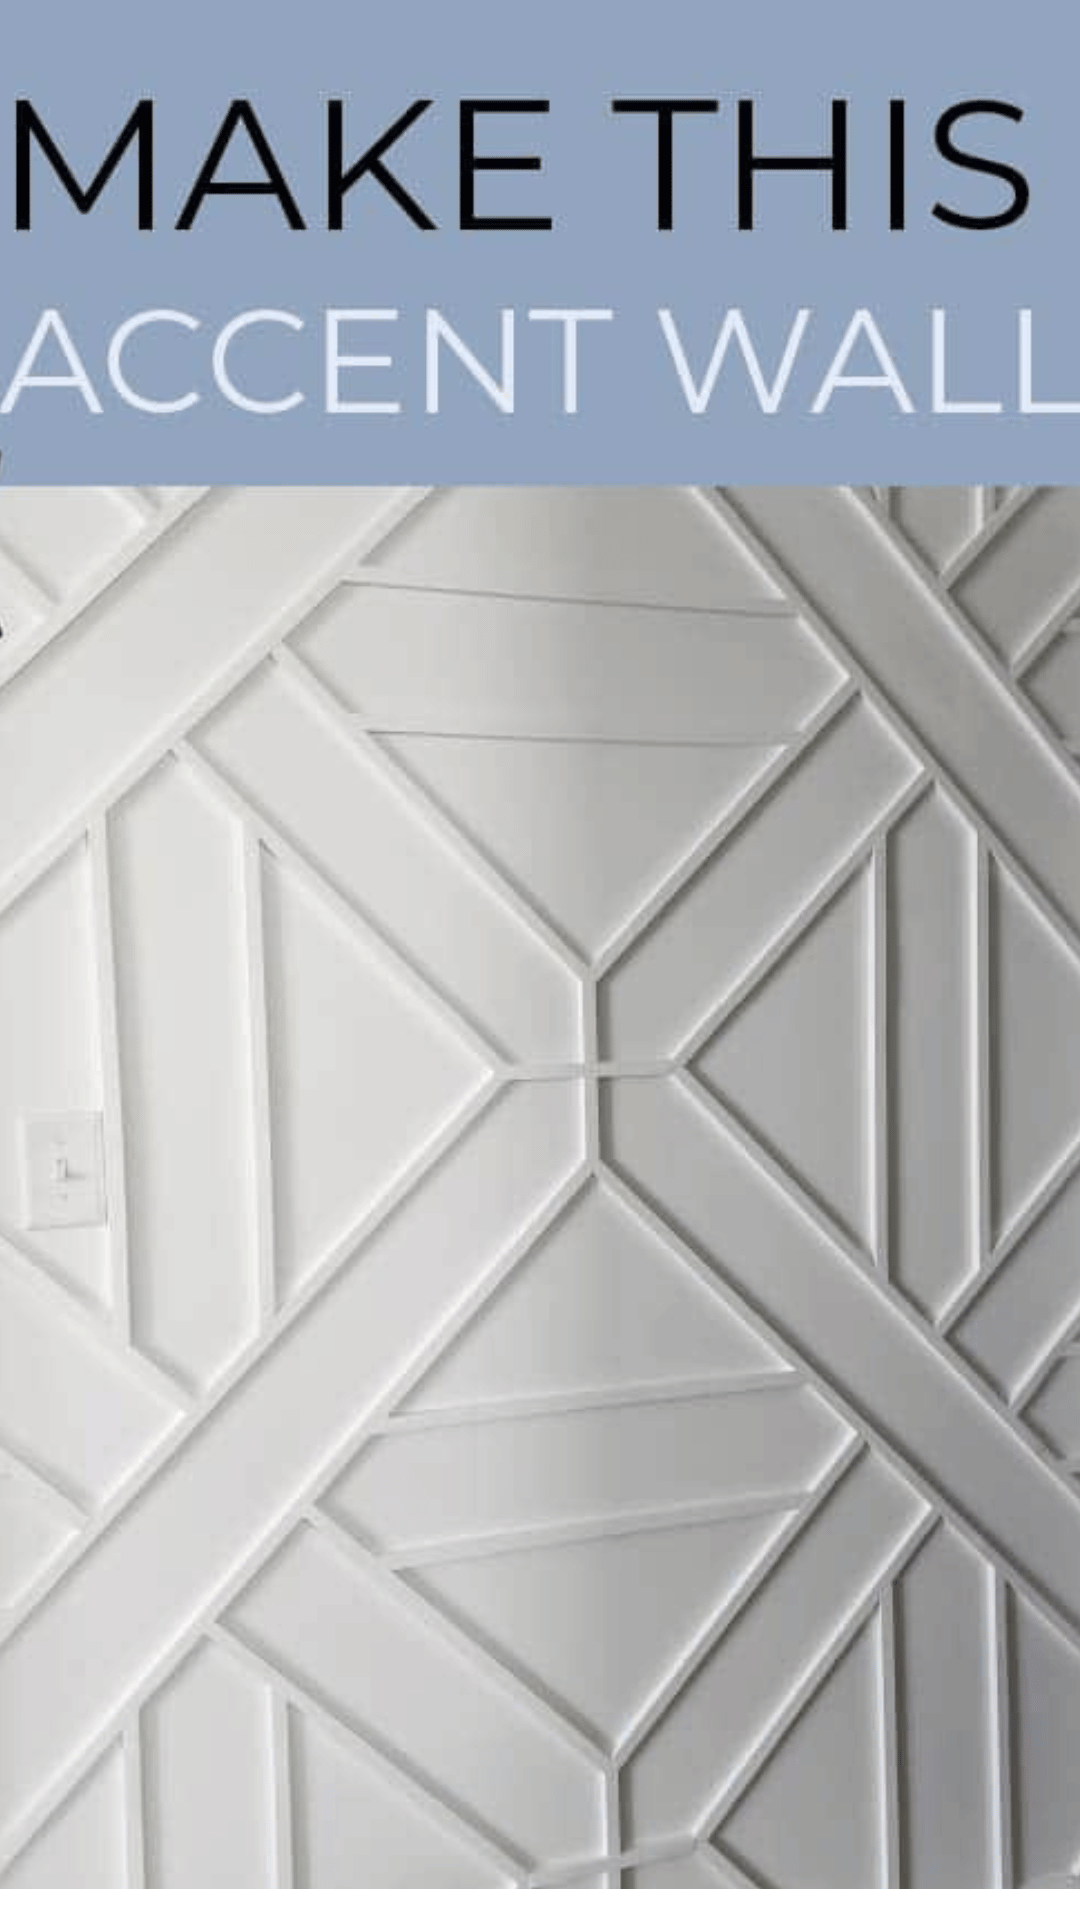
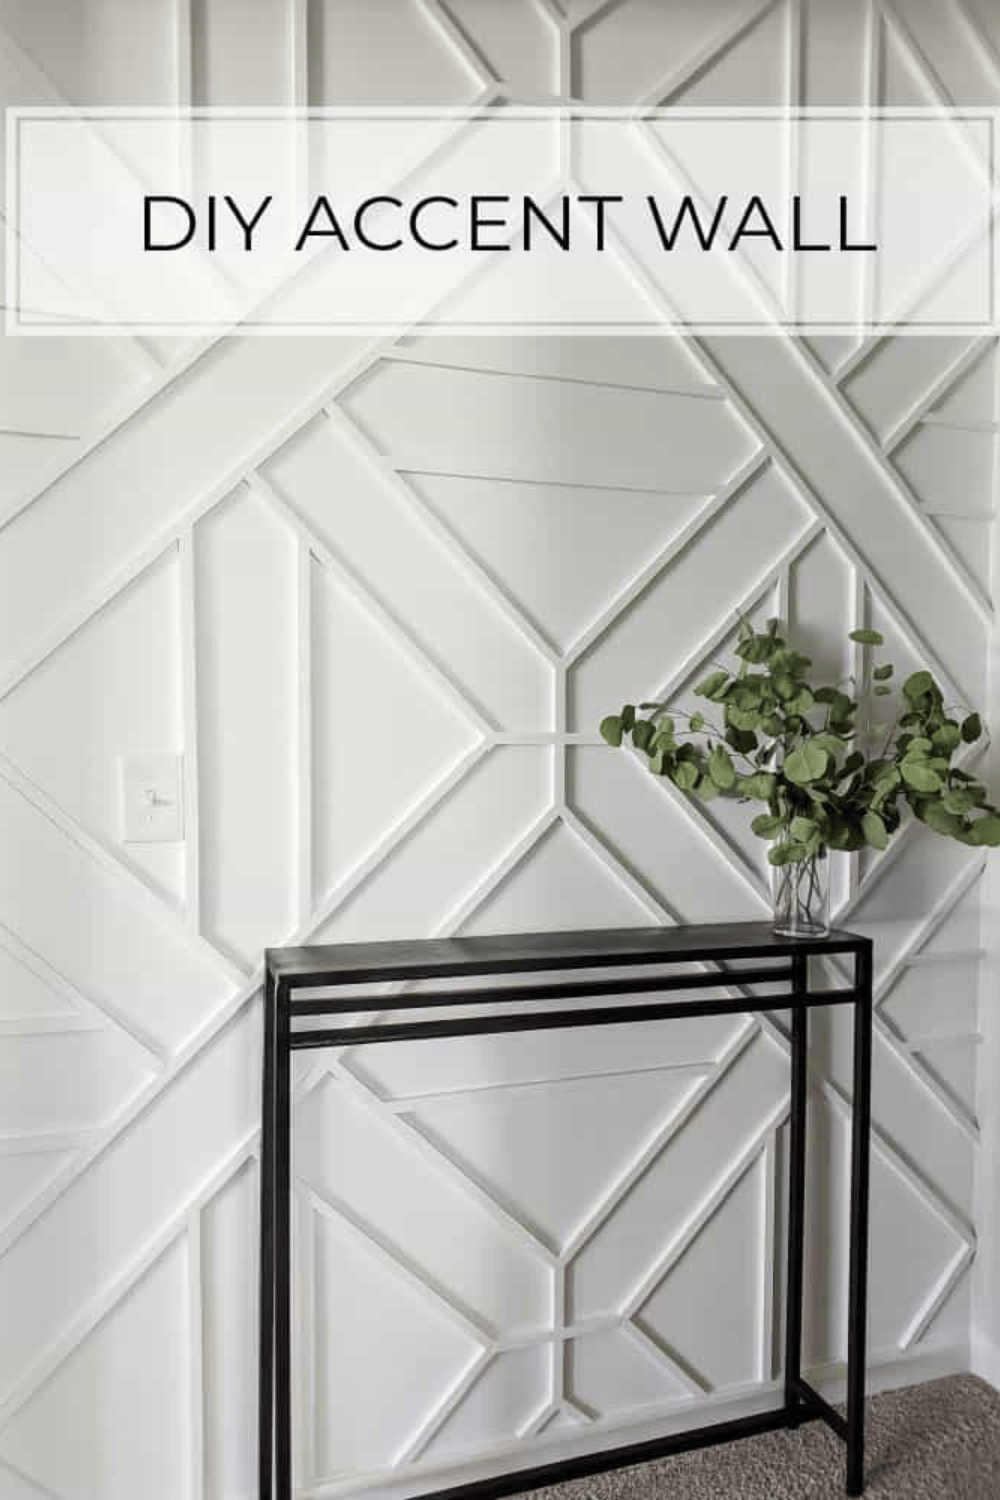
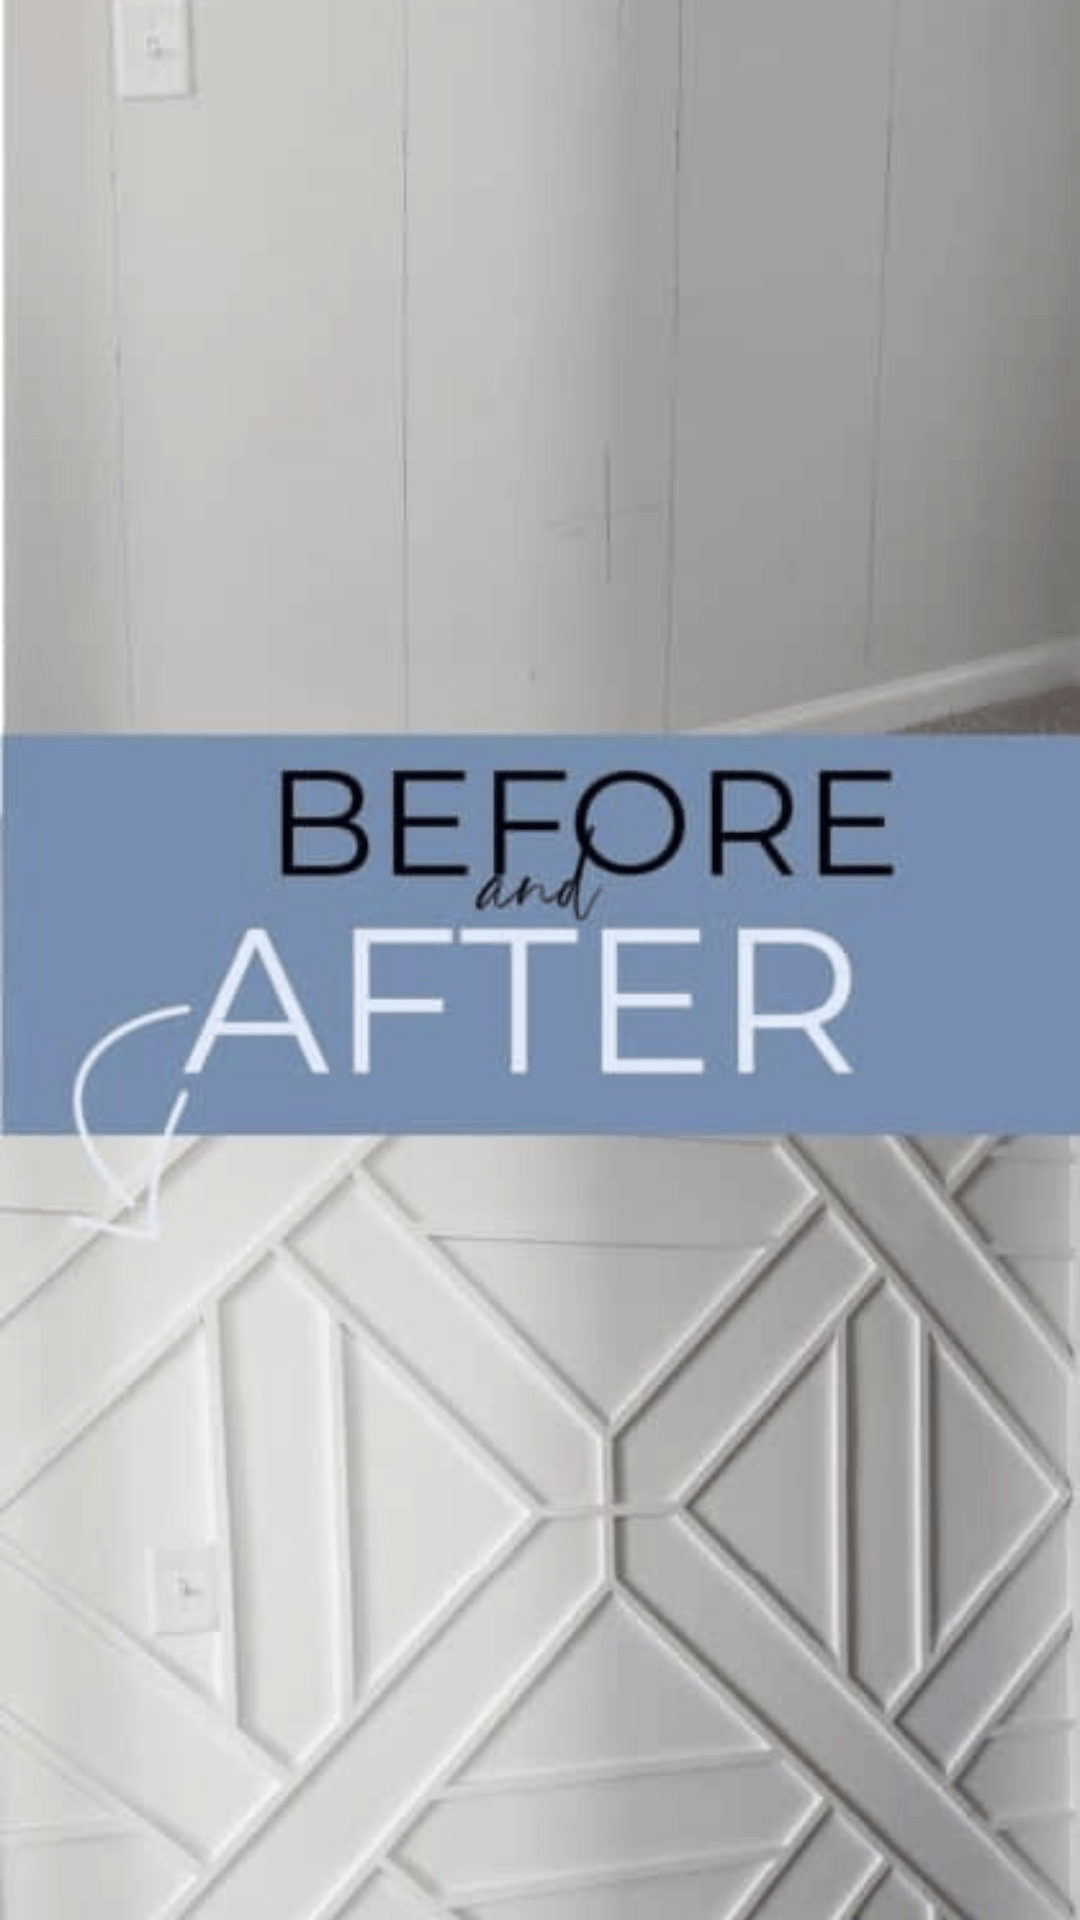
There you have it! Now you know how to make a beautiful feature wall using wood trim. The great thing about this process is that is can be applied to any pattern you choose for your accent wall.
Here is the design
FAQs
1. Question: What do I need to build a white wood trim accent wall?
Answer: If white wood trim is your idea of the perfect accent wall, you’ll be glad to know that you don’t need a lot to make it look stunning. All you’ll need are white wood board, white trim pieces, a saw, screws, a drill and some white paint or stain. You can follow easy instructions online to assemble the white wood boards in whatever way you like best. Beyond that, you can use white paint to fill any gaps before screwing the white trim pieces in for the finishing touch. In no time at all, you’ll have created a beautiful white accent wall that will look brand new and incredibly stylish.
2. Question: How much trim do I need?
Answer: Everything you need to know about how much trim you should buy for your white accent wall is just a few clicks away! If your white accent wall is topping out at 10 feet tall, then a minimum of six lengths of trim will provide plenty of coverage and make sure that none of the wall peeks through. If you’re aiming for total coverage with no gaps, opting for eight to nine lengths is best. To get the exact measurements, measure from the top to the bottom of your wall and then divide by the length of the trim pieces — voila! Now you have an exact number to ensure that your white accent wall looks perfect!
3. Question:How do I cut the trim?
Answer: Adding white accent walls throughout the house is a popular and chic way to elevate the level of modern style in any room. But if white accent walls already adorn your home, then taking it up a notch with trim is definitely within reach! Luckily, cutting trim doesn’t have to be a daunting task - here are some tips for easy and effective trim cutting. First off, mark the wall where you want the trim to go. Make sure to use something that can easily be written on and erased like a white pencil or chalk. Next, take careful measurements particularly at corners and cut the trim with an adjustable miter saw. Finally, use a nail gun or construction adhesive to secure the baseboard in place. And there you have it: white accent walls with amazing DIY-level trimming that will bring sophisticated charm to any space!
4. Question: How do I attach the trim to the wall?
Answer: Installing trim to white accent walls is just the touch it needs to make the wall come alive. It's a relatively easy task if you take the time to measure and plan carefully. Starting from one corner, use nails or a staple gun to attach your white trim pieces along the top of the wall – directly underneath the ceiling molding. Make sure each piece fits tightly as you work around each corner of the room. If needed, fill in any spaces with wood putty before painting over them for a seamless look. You'll be excited about how much your white accent wall stands out with this simple addition!
5. Question: How do I paint the trim?
Answer: Painting the trim white is a great way to give any room an instant facelift! Whether you're accenting white wall paint or creating a white accent wall, adding white trim doesn't take a lot of effort and can instantly add a modern twist to your home. First, make sure you have plenty of white latex paint (acrylic is better for larger areas) and an assortment of fine-tipped brushes for those hard-to-reach places. Start by covering the area with masking tape so you don't accidentally get paint on other surfaces. Once that's done, apply an even layer or two of white paint and let it dry. An eyeshadow brush is perfect for touching up tricky corners and edges. Let everything dry and you should be left with crisp white trim that will set off that white accent wall perfectly!
6. Question: What type of paint do I use for the trim?
Answer: Painting the trim white can be a great way to tie together a white accent wall with the rest of your room. However, not all white paint is created equal! You'll want to make sure you use an interior satin or semi-gloss latex paint, as these are more durable than other types and will stand up to the activity of daily life in your home. Additionally, if you go with semi-gloss, it may be easier to clean should something end up on that white trim. Overall, though, white paint can completely transform any room and set off your white accent wall perfectly!
7. Question: How do I protect the floor while I'm working?
Answer: If you're doing a project that puts your floors in jeopardy, white accent walls are key to preventing damage! Their white-wash finish is tough and resistant to spills of any kind, not to mention they offer a subtle layer of insulation that helps reduce tool and material noise while you work. With white accent walls, the main precaution is making sure the wall is properly sealed which can be easily done with a high-heat sealer. Once installation and sealing is complete, your white accent walls will be your best ally for keeping your working area safe from chances of floor damage.
8. Question: How long will this project take?
Answer: If you're asking yourself, "How long will this white accent wall project take?", we've got your answer – and it's just in time for that summer home refresh. Don't worry, because the white accent wall isn't too labor-intensive; priming, painting, and admiring it can all be done in a relatively short amount of time. In fact, all you really need is a day or two depending on the size of the white accent wall. So get ready to drink your morning latte while admiring your new white accent wall!
9. Question: What are some common mistakes people make when building a white wood trim accent wall?
Answer: Creating a white wood trim accent wall can be an intriguing way to add a chic and modern look to any space. But in your excitement, you may make some costly mistakes along the way. Common blunders people make here range from not properly prepping the walls for adhesive to overlooking white-washing techniques for a more rustic aesthetic. If you want pro-level results, take the time to do your research before tackling this project — it will save you loads of headache (and possibly money!). Just remember that a white accent wall can take any room from meh to wow if done correctly; so don't get discouraged if things don't go exactly as planned from the get-go.
10. Question: What are some tips for building a white wood trim accent wall?
Answer: Let's white-wash your home decor game with a white wood trim accent wall! This style of wall will really take your room to the next level, adding style and interest to any space. First things first, collect your white wood trim pieces for your wall. Measure out each area you want to use them in and begin construction. Be sure to predrill holes before nailing the pieces into place. Pre-staining or pre-priming the boards before attaching them is recommended so they look their best once the wall is finished. Finally, give everything a final coat of white paint or white wax to protect the surface and finish off your white accent wall. You'll be wow-ed by how elegant and contemporary it looks!