

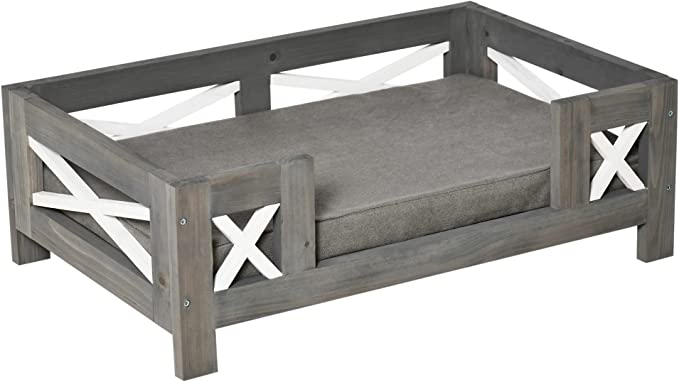
Once upon a time, there was a carpenter and dog-lover named Paul who wanted to make something special for his beloved pup. His idea? To build an amazing wooden bed specifically designed for her comfort!
Paul started by heading to the hardware store and picking up some basic supplies: wood, screws, sandpaper, drill bits, saws and all the necessary tools. He had always been handy with tools but he couldn’t help but get excited about this project. After getting back home from his shopping trip, Paul sat down at his workbench and got to work.
He began by cutting several pieces of wood into shapes that would form the base of the bed frame—including two rectangles for the sides and one big piece that served as both bottom support and mattress platform—then joined them together using screws in order to create a sturdy foundation. Once complete, it was time to add some flare; so Paul carefully carved decorative patterns on each side before sanding down any rough edges or imperfections.
Next came construction of four legs which were made out of scrap pieces he had left over after making the main frame; these served both as support posts as well as aesthetic accents when they were later painted black with white spots (like his pup!). It took several hours until everything finally fit together just right; but it was worth it when he stepped back to admire how great it looked!
The finishing touches included adding soft padding inside along with some throw pillows on top for extra coziness during those cold winter nights…and voila! The perfect wooden doggie bed now stood proudly in front of him—ready for snuggles galore!
Paul’s pup could not have been happier with her new home away from home…the look in her eyes said it all: she absolutely loved it! And every night since then has only grown more enjoyable thanks to their cozy little creation. Truly this is what DIY projects are all about: creating something beautiful while also delighting someone you love deeply—all in one go…so if you want your own furry friend’s tail wagging soon too why not try building your own wooden pet bed today?

Out of curiosity
- What are your thoughts on using wood to build a dog bed?
- What type of wood did you use for your dog bed?
- What is your favorite part about building a dog bed from wood?
- How long did it take you to build the dog bed?
- Would you recommend building a dog bed from wood to others?

FAQs
1. How do I build a dog bed from wood?
Answer: Building a dog bed from wood is actually easier than you might think! All it really takes are a few basic tools, some wood pieces and an afternoon of patience.
First, begin by measuring the space your pup will use to sleep. This determines how much wood you'll need for the frame and helps inform what size mattress or cushion is right for them. Once you have these measurements ready to go, head to your local home improvement store and select your materials:
- A piece of plywood (measurements taken earlier)
- Three 2x4s that match the length of the plywood (these will be used in making the frame)
- Seventeen 1 1/4 inch deck screws
- One box of finish nails
- Sandpaper in various grits (for finishing touches on all surfaces)
Next: Cut two out of three 2x4s into four equal lengths using a circular saw or handsaw depending on your comfort level—the final one should remain intact as it forms one side of the frame’s perimeter when assembled with others firmly connected using those screws mentioned earlier; this creates an incredibly sturdy base for our pup's new snoozing spot! Now comes time for sanding any rough edges or corners ensuring our pup receives only comfort without any risk of bumps or scrapes during their naptime cuddles; once complete securely attach bottom layer with finish nails after verifying all edges line up perfectly :)
Finally comes time to add whatever kind luxury features that suit both canine companion AND owner best--a thickly padded mattress provides extra support while allowing maximum freedom during restful periods OR perhaps adding a few cozy cushions around provide perfect atmosphere & enhances overall look/style? Whatever chosen design element make sure its secured safely as it could become loose over time if improperly placed so double check these details prior placing!
And just like that - voilà! We've created an adorable doggy bed customized specifically towards their needs offering quality & safety unmatched by alternatives found elsewhere; Super proud job well done & many hours enjoyable together ahead :D
2.What kind of wood should I use for a dog bed?
Answer: When you’re looking for the perfect type of wood to make your pup a cozy bed, you should consider these factors: durability, comfort, and sustainability.
- Durability is key in making sure your pup's bed stands up against their petting claws and jumping. Hardwoods like oak, walnut, hickory, mahogany, cherry or teak are all great choices since they are resistant to scratches and wear-and-tear from playing. However if your dog likes to nestle into their bedding at night it may be better to find a softer hardwood such as maple or birch which can provide some cushioning and extra warmth. Softwoods – including pine or cedar – will break down more quickly but both varieties offer natural antifungal properties so neither one is necessarily wrong for use in the long term.
- You also want to keep comfort in mind when selecting wood for your dog's bedding; it's important that they have plenty of room space with enough cushions and support if necessary (for dogs who may suffer from joint pain). Consider angling pieces of softwood within the frame creating divots that give extra patches of padding around the edges while still being easy on doggy joints! All woods typically range between an R value of 1 - 3 (the higher number indicating greater resistance) so take note when picking out which type best outlets their needs; this will help maximize insulation while protecting them from drafts during colder days/nights too!
- Lastly, sustainability matters too! By using responsibly sourced wood – FSC Certified woods are always a safe bet especially those made with recycled materials – you're not only helping protect our environment but also giving back something good for future generations as well! When partnered with organic mattress fillings like wool or cotton batting there isn't anything healthier than this combination for canine sleepers young/old alike!
So overall if you’re looking for an ideal material selection on what kind of wood should I use for a dog bed then look no further than hardwoods namely oak/walnut/hickory etc., whilst keeping comfort & insulation levels in mind plus always aiming towards sustainably sourced options whenever possible–this way everyone wins out happy & healthy together inside pet beds fit for royalty (and regular pups)!
3. How do I make a dog bed that is comfortable and durable?
Answer: Making a dog bed that is both comfortable and durable can be a challenge, but it doesn't have to be. The key is to make sure you use materials that are designed specifically for pet beds and follow the below steps:
- Start by measuring your dog’s size so you know what dimensions you need for the bed. Make sure to allow at least two inches of extra space on all sides, as this will give your pup plenty of room to move around and get cozy.
- Once you know what size bed base you will need, choose an appropriate cushion material such as high-density foam or memory foam inserts. These materials are designed with durability in mind, so they’ll last longer and provide better support for your pup’s joints and muscles!
- The next step is to choose a fabric cover for the cushioning material that matches your style but also provides comfort for your pup - think fabrics like microfiber fleece or recycled polyester-cotton blend options which have proven great results when used in pet beds over time!
- Next comes sewing - if you’re feeling confident enough try tackling it yourself using high quality upholstery thread (not regular sewing threads), otherwise enlist help from someone who knows how to sew on industrial machines as these types of cushions require sturdier stitching than usual!
- Finally finish off with accessories like bolsters around the side walls – consider eco-friendly options such as organic buckwheat hulls filled into pillowcases made from natural fibers – these provide support while minimising allergens being shed into the air!
- once everything is sewn together complete one final round of checking seams (or use a seam roller tool) plus set aside some time each week/month depending on usage levels - giving them an occasional shake out & airing can work wonders too!
- With these simple steps following through, making a comfortable & durable dog bed should be no problem at all - happy crafting & thanks again for reading this answer!
4. What are some tips for building a dog bed from wood?
Answer: Building a beautiful and comfortable wooden dog bed doesn't need to be complicated, and you can create a cozy spot for your pup with just a few tools and supplies. Here are some tips to help make sure your DIY project goes smoothly:
- Choose the appropriate wood type. If you're using wood from your backyard, like pine or cedar, make sure the boards are straight and without any large knots or warping. You'll also want to make sure that any finished surface is sanded smooth so it won't cut or scratch Fido's fur!
- Measure twice and cut once! Start by measuring out the size of bed you'd like to build—taking into consideration the size of your pet—then use a saw (or have it pre-cut at a home improvement store) to cut out two pieces per side panel, four pieces total for each bedside panel. Make sure they’re properly measured before cutting!
- Join the panels together with screws or nails, creating two sides plus one bottom plank that will hold everything together after assembly (see sketch figure below). Take care when attaching them so all corners are lined up correctly for easy installation later on.
- Add extra support underneath by adding crossbeams where necessary; this will keep the frame from sagging due to weight over time (use 2x4s if desired). Secure these in place with screws as well before moving onto coating preparation steps—this way they won't move around during handling down further in construction process!
- 5a) Prepare finish coatings: Sand down entire structure lightly with medium grade sandpaper/discs - this will remove splinters & give an even base finish layer prior adding any sealers/finishes-to-come later; then follow up by cleaning off all dust particles created afterward w/ damp cloth - making sure not too wet though as waterlogged wood becomes weak structurally speaking !!! Also apply shrink wrap protective film over areas not being painted/stained too keep them clean while working on others parts 6b) Begin applying stain first - even coats across entire surface & allow adequate dry time between layers 7c) After finishing stained portion begin painting other exposed surfaces & edges 8d) When atmosphere is dry enough commence final assembly 9e) Finally add last touchups such as corner protectors etc 10f.) Upon completion test strength of frame firstly & then let lucky pup jump in !
- By following these simple steps you'll have an awesome new dog bed in no time at all–just don’t forget about safety precautions throughout since wooden structures inherently involve sharp edges which could potentially harm pet paws… good luck building Fido's dream canine pad 🐶
5. What is the best way to finish a dog bed made from wood?
Answer: Finishing a wooden dog bed is easy, and there are several options to choose from. For a simple finish that will protect the wood and make it look good, you can use an oil-based polyurethane. This coating helps prevent moisture damage while giving the bed a nice shine without obscuring the natural color of the wood. If you want more protection or don’t want to change the color of your bed too much, you can also apply paint or stain to your wooden dog bed. Paints and stains come in many colors, so you can easily find one that matches your existing decor or creates a totally new look for your pet’s sleeping spot.
Before applying any finish product to your wooden dog bed, be sure it is completely sanded free from splinters and protrusions so that nothing rubs against your pup’s fur. Sanding gives any finish product better adhesion for superior durability over time as well as helping create a smooth surface for them to sleep on.
Once you have chosen which type of finish best suits both yourself and your fur baby’s needs, follow each manufacturer's application instructions carefully for best results—most finishes require two coats for ultimate durability—and allow 24 hours between coats before letting Fido enjoy his new sleeping space!