


Band saws are a unique type of saw that offer a great deal of flexibility for craftspeople. They can be used for everything from resawing lumber to cutting intricate curves, and they come in a variety of different sizes to fit the needs of any shop. In this beginner's guide, we will discuss the basics of band saws so that you can decide if one is right for you!
To start, let’s look at the different types of band saws available. The two main categories are stationary and portable, with each offering its own set of advantages and disadvantages. Stationary band saws are great for larger projects as they provide more space to work with than their smaller counterparts. On the other hand, portable
Cut it Out! An Overview of Stationary and Portable Band Saws
The world of band saws can be a confusing one. Do you need a stationary or portable band saw? What’s the difference anyway? Don't worry, we’ve got you covered. Here’s a quick overview of the two main types of band saws and their uses.
Stationary Band Saws
Stationary band saws are the heavy-duty workhorses of the woodworking world. They are designed to stay in one place, usually mounted to the floor or benchtop. Typically, they have higher power ratings than their portable counterparts and can cut through thicker materials with ease. They also come with adjustable blades which allow you to make precise cuts on all sorts of shapes and sizes.
Keep in mind that stationary band saws require quite a bit more setup than portable models—so if mobility is your goal, this probably isn't the right choice for you!
Portable Band Saws
Portable band saws are exactly what their name implies—portable! These tools are lightweight and small enough to be carried around easily, making them ideal for people who need to take their saw with them wherever they go. Portable models usually feature lower power ratings than stationary ones but offer plenty of cutting power for most jobs. Plus, many modern versions come with built-in LED lights for precision cutting in tight spaces! Additionally, many portable band saws feature adjustable speed settings as well as variable tooth settings which give users greater control over their projects.
Final Thoughts:
Whether your project requires portability or power, there's a band saw out there that fits your needs perfectly! Stationary models offer more cutting power while portable ones provide convenience and maneuverability—it all depends on what type of job you're tackling at any given moment! Whichever type you choose, just make sure to do some research before making your purchase so that you get the right tool for the job! With these tips in mind, it should be easy to find the perfect fit for your next project!
PROFESSIONAL QUALITY: Cut through tougher materials with ease?
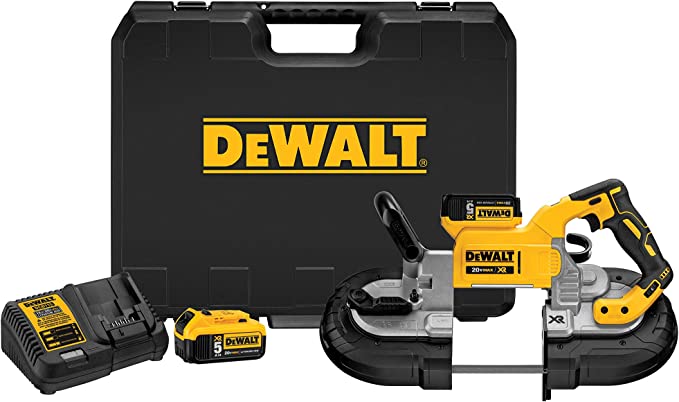
DEWALT DCS374P2 20V Max Deep Cut Band Saw Kit
This 20V MAX* Brushless Band Saw has the power and runtime you expect from DEWALT. With a 20V MAX* Brushless motor and (2) 20V MAX* 5Ah batteries, DEWALT 20V band saw can cut up to 5-inch x 4-3/4-inch rectangular material and up to 4-inch round material. It's compatible with all DEWALT 20V MAX* and FLEXVOLT batteries, includes band saw blade speed control, integrated hang hook, and a durable rubber base.
Anbull Portable Band Saw with Removable Alloy Steel Base, 10A, 1100W Motor, 5-inch Deep Cut, with .020-by-44-7/8-Inch 14 TPI Saw Blade and Led Spotlight
Get ready to tackle those tough jobsite cuts with this powerful mobile metal band saw! It's designed especially for power-through cutting of iron, steel, aluminum, copper and PVC. The 6.6kg alloy workbench base is adjustable from 0° to 45° making it perfect for a variety of materials and applications – the variable speed dial allows you to set between 100ft/minute & 350ft/min depending on your specific project needs. Plus there's plenty of hand space thanks to its multi-position front handle which helps ensure accuracy while alleviating user fatigue too - all lit up by an LED sight light so you don't miss any detail in low visibility situations either 😎
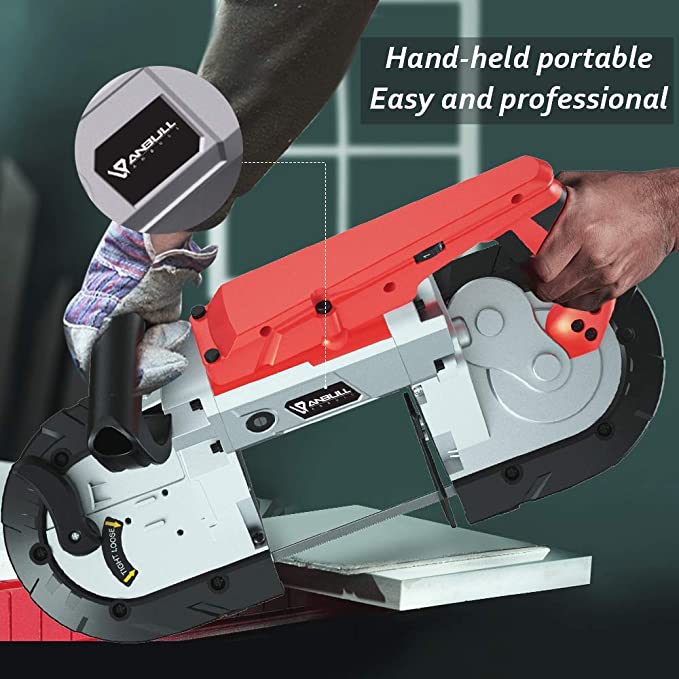
Anbull Portable Band Saw with Removable Alloy Steel Base, 10A, 1100W Motor, 5-inch Deep Cut, with .020-by-44-7/8-Inch 14 TPI Saw Blade and Led Spotlight
SIMPLE YET SOLID: They are made with professional quality in mind, so they will last a long time.
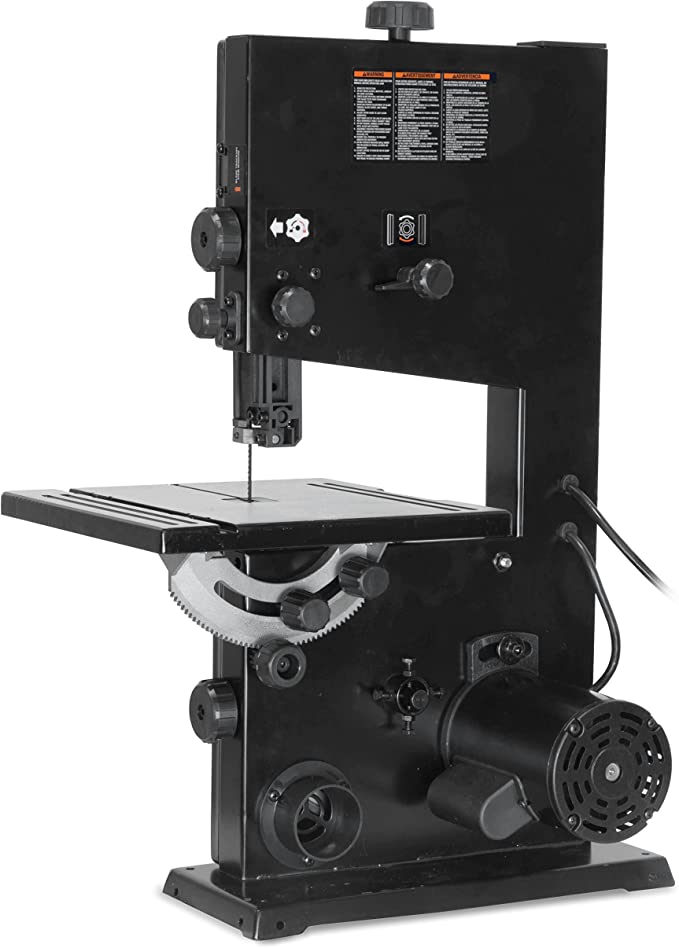
WEN 3959 2.5-Amp 9-Inch Benchtop Band Saw
There's nothing quite like having a saw that is both compact and powerful, and the WEN 3959 2.5-Amp 9-Inch Benchtop Band Saw delivers just that. It features a 2.5-Amp motor that can rotate its included 1/4-Inch blade up to 2500 feet per minute and make powerful cuts of up to 3-1/2 inches deep and 9 inches wide. Plus, the WEN Band Saw accepts 59-1/2 inch blades from 1/8 to 3/8 inch in width for even more intricate cutting options. With its 12-1/4 x 11-7/8 inch work table, adjustable fence for creating straight cuts, onboard dust port for easy cleanup, blade guard for safety, miter gauge for angled cuts, and ability to tilt beveled up to 45 degrees; you won't find many better band saws out there! And because it’s WEN product, you know your WEN 9-Inch benchtop band saw is backed by a two year warranty and reliable customer service.
FAQ`s
1. QUESTION: What are the parts of a band saw?
ANSWER: The parts of a band saw are pretty straightforward, yet critical for ensuring its operation. There are four main components to the traditional band saw: the frame, power source, blade, and guide system.
Starting with the frame of a band saw; this is typically made of high-grade metal and has two working areas – an upper one (the table) and lower one (the base). The tabletop is where you can mount your material when you plan on cutting it – usually secured by a clamp. As for the size of both areas, they vary depending on the make and model or type of job you need to do.
Next comes the power source which can be either electric or pneumatic motors. This component helps to provide energy to rotate either its belt drive or direct drive pulley systems which feed into subsequent parts like its blade guide system or roller guides mentioned down below.
Thirdly there’s the blade itself which plays an important role in terms of shape retention while cutting as well as accuracy in general. These blades come in different sizes such as 1/8th inch up to 3 inches wide depending on what kind miter cuts you need done at any given time - these types range from multiple pivot points (for curved cuts), triangular frames (for straight cutting), combined miter-bevel cuts, etc... Oh - not forgetting that these blades also have teeth along their edges useful for making precise angles too!
Lastly there’s also an accompanying guide system fitted onto most modern models out there; this comprises two main pieces - thrust bearings above your workpiece surface that help keep friction between workpiece and material low; plus roller guides positioned along each respective side providing horizontal support for higher tension settings if needed e.g during ripping operations etc… These rollers ease up how much pressure needs being applied by controlling where exactly forces need redirecting from throughout each cut taking place along said piece! In addition some models may even include auxiliary sliding tables as bonus accessories helpful for fine tuning precision levels during certain tasks.... So if all four presented components are working together harmoniously then it should not be difficult task at all achieving desired results :)
2. How do I set up my band saw?
Setting up your band saw can seem intimidating, but following these steps will help make the process easier and more successful.
Step 1: Gather Supplies - Make sure you have all of the materials needed to set up your band saw, such as a sturdy workbench, protective equipment (eye protection and hearing protection are a must!), clamps for blade tensioning, measuring tools (at least a ruler), lubricants or waxes for rust prevention/lubrication, blades and cutting guides.
Step 2: Secure Workpiece - Place your workpiece on the workbench securely using clamps to hold it in place. It is important that no part of your workpiece is able to move while you are cutting. This will allow you to accurately cut what you want without causing any risk of injury or damage to yourself or those around you.
Step 3: Install Blade & Tension - Once your piece is secured in place, install the correct sized blade onto the machine according to manufacturer instructions. Use a torque wrench when tightening screws and bolts associated with attaching blades. After installation makes sure there is enough tension on the blade so it can do its job properly without vibrating excessively during operation which can be dangerous.. When in doubt refer back to manufacturer instructions as too much or too little tension could cause problems during use and damage other components of machine over time if not addressed appropriately!
Update 6/8 : Step 4: Prepare Table - Before turning on your bandsaw make sure all parts of the table top have been properly aligned with each otherxl Next adjust miter guides where applicable corresponding again with manufacturer's instructions before starting operations Finally check that belts are correctly adjusted for smoother operation when operational Step 5: Lubricate Machine- Check machines manual for specific lubrication needs depending upon type used For most types general lubricating oils or waxes should be applied at appropriate points along motion path These points include (but may not limited) idler pulley spindle bearings lower guide blocks upper brackets etc Step 6 : Test Run Your Saw- Before officially starting operations run saw briefly at lowest speed until comfortable doing so Then increase speed gradually still familiarizing yourself with how this particular machine operates Once finished running test shut off power immediately Never leave an operating band saw unattended under any circumstances Following these six simple steps should give anyone setting up their own personal shop bandsaws good footing start out safely enjoying hobby
3. How do I use a band saw?
Using a band saw is not as difficult as it may seem at first glance. In this answer, I will explain the basics of how to safely and effectively use a band saw.
First and foremost, it’s important to understand how a band saw works. A band saw uses an endless looped blade that moves rapidly in an up-and-down motion over two pulleys in order to cut through wood or other materials. The teeth on the blades can be used for both curved and straight cuts depending on what you need to accomplish with your project.
Before using your band saw, remember to always wear proper safety gear such as gloves, protective eyewear and hearing protection. Even though the chances of injury are low provided you follow these guidelines closely, accidents can still occur so always be extra careful when handling a potentially dangerous piece of machinery like this one!
Start setting up your station by locating and clamping down whatever material you plan on cutting securely onto the table surface beneath the upper guide arm. Make sure everything is securely and tightly held in place before turning on the power switch located near the machine's base (check manufacturer's instructions). Once powered up adjust any particular settings you may need for your task at hand such as blade size or depth adjustment screws if applicable – again check user manual for specifics regarding model type etc... Also make sure all safety guards are properly engaged!
Now that everything is all set up properly it’s finally time for cutting! Lowering down onto your material slowly apply gentle pressure increasing gradually until desired depth has been achieved , keeping uniform pressure throughout entire cut procedure - staying focused at all times while doing this operation but without forcing things (don't ‘muscle' density together). Depending upon which type of blade being used either follow natural lines if available or alternatively draw predetermined lines using markers etc... prior beginning work; often being faster than having guesswork rather than accurate measurements - allowing greater time savings overall ...once finished simply turn off power switch again if proceeding with another work cycle else unplug tool directly from wall outlet socket once completed ! Congratulations – You've just correctly learned how To Use Band Saw Machine !!
4. What are some common band saw problems?
One of the most common problems that people have with band saws is getting them to run smoothly. The blades become dull over time, causing them to not cut as well as they should, resulting in a lot of vibration and making it difficult to get a precise cut.
To help avoid this problem, you should regularly inspect your blades for wear and tear. Make sure that you're replacing blades when necessary - if your blades are very worn down then it's likely time for a replacement. You can also try sharpening dulled or pitted blades which can extend their life and reduce friction on the blade as it cuts through materials.
Another common issue is misalignment in the pulley system or other components of the bandsaw causing wobbling or vibration during cutting operations. This is usually caused by wear and tear over time, so make sure to inspect all parts regularly for wear marks such as scratches or dents that could be affecting alignment between different components inside the machine.
Finally, some operators will experience uneven cuts due to their tools slipping while operating - either due to inadequate blade tensioning or incorrect setup of fixtures within the machine itself (i.e., inadequate clamping). This can lead to incomplete cuts which require cleanup work afterwards so always make sure that you properly set up your band saw before each use!