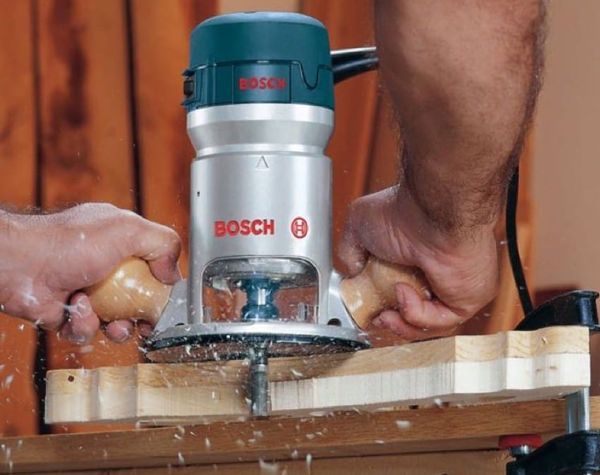


A router is a powerful cutting tool that can be used to cut various grooves, angles, and shapes into wood. These handy tools are excellent for woodworking projects, including cabinet making, cutting molding, and furniture design. In this article, we'll show you how to use a router for your next woodworking project.
How we choose:
We read thousands of reviews on Amazon to find the best ways you can use a router for a project. By using consumer feedback and expert guidance, we are able to confidently narrow down the products worth reviewing. We then take all of that intelligence and data to present you with a clear, straightforward, and focused take of the top products, providing all the information you need and care about before making your purchase. So whether you’re looking for the best …. or the best …., We’ve got you covered.
Using a Router for Straight Cuts
One of the most common uses for a router is making straight cuts in wood. To do this, you'll need to attach a straight bit to your router. Once the bit is attached, you can start making cuts by following these steps:
1. Set up your work area
Make sure that you have enough space to work and that your work surface is level. You might also want to clamp down your piece of wood so that it doesn't move around while you're working.
2. Position the router
Put the router on top of your wood and make sure that the bit is positioned where you want your cut to start.
3. Turn on the router
Before you start cutting, make sure that your router is turned on and set to the correct speed.
4. Begin cutting
Slowly guide the router along your marked line while applying pressure evenly. Be careful not to apply too much pressure or go too fast, as this can cause the router to veer off course or even break the bit.
5. Finish up
When you reach the end of your cut, gently lift the router off of the wood and turn off the power.
2. Using a Router for Cabinet Making
One of the most popular uses for a router is cabinet making. Routers can be used to create rabbets, dadoes, and other joints that are necessary for cabinet construction. When using a router for cabinet making, it's important to use the proper type of bit and to make sure that the bit is sharp. You'll also want to use a steady hand and take your time when cutting the joints.
Router table

3. Using a Router for Cutting Molding
Another popular use for routers is cutting molding. Routers can be used to create custom moldings for doorways, windows, and other openings in your home. When using a router for cutting molding, it's important to use the proper type of bit and to make sure that the bit is sharp. You'll also want to use a steady hand and take your time when cutting the moldings.
4. Using a Router for Furniture Design
Routers can also be used for furniture design. Routers can be used to create custom legs and bases for tables and chairs. They can also be used to create decorative elements such as inlays and medallions. When using a router for furniture design, it's important to use the proper type of bit and to make sure that the bit is sharp. You'll also want to use a steady hand and take your time when creating the pieces.

5. Using a Router for Recessing Door Hinges

Hinges and lock faceplates go in recessed to give a more finished appearance. This is done with router jigs, which cut the space for these parts easily so they don't have ugly slots like other machines would create when cutting those same openings.

Conclusion:
Routers are powerful tools that can be used to create various grooves, angles, and shapes in wood. They're excellent for woodworking projects like cabinet making, cutting molding, and furniture design. In this article, we've shown you how to use routers for these three popular woodworking applications. We hope you found this article helpful!

FAQs
1. What are some of the best ways to use a router for woodworking projects?
Answer: Woodworking is an incredibly diverse and fun set of tools for people of all levels. For those who are more serious about the art, a router is essential to making precise cuts and neat designs. Using a router can be overwhelming at first, but there are several great ways to make use of it on projects ranging from simple cabinetry to intricate carving. Getting accurate measurements is key; this can be accomplished through the use of measuring tape or clamps, making sure the router's bit stays in contact with the workpiece surface as you move it. Routes can also be used to jazz up furniture pieces with decorative edging and joinery techniques, like mortise-and-tenon joints or dovetailing. In addition, routers can help create original designs by creating shapes and notching into board edges—all of which add up to a truly unique woodworking project.
2. What are some of the benefits of using a router for woodworking projects?
Answer: A router is an extremely valuable tool for any woodworker looking to take their craft to the next level. Not only does a router provide the ability to cut intricate designs and shapes, but it also provides better control and accuracy than traditional saws. Furthermore, with the use of special templates, a router can be used to create identical pieces with ease, ensuring consistency of product for large or small projects. By allowing woodworkers to make more creative woodworking projects without sacrificing precision and accuracy, routers are becoming a "must have" tool in any serious woodworker’s shop.
3. How do I choose the right router bit for my project?
Answer: Choosing the right router bit for your project can seem like a daunting task, but it doesn't have to be! Here are 7 tips to help you make sure you choose the correct router bit:
Determine what type of material you will be working with. Router bits can be used on several different materials such as wood, plastic, aluminum, or brass - each requiring different types of bits.
Think about how much depth you need in your cuts and select a corresponding bit size that is able to accommodate your needs. You may want to opt for multiple sizes if you plan on tackling various depths during your project.
Take into consideration the number of flutes and spirals per inch when selecting a router bit for more intricate carving designs; the higher this number is, the smoother and cleaner your finished product will look.
For break-free cuts in softer materials (like wood) consider using a carbide tipped router bit instead of a steel one as carbide stays sharper longer allowing for smoother cutting action throughout your project without having to constantly change out bits due to dulling blades .
Selecting an Anti-kickback style design that has deep relief angles helps reduce chatter when drilling and creates cleaner cuts with less force needed from the user’s end while gripping onto their workpiece tightly during use .
Read up on how certain shapes are best used in particular applications before purchasing any specific shaped router bits so that they’re optimized best suited toward exactly what it is that you want accomplished; round over edges versus quarter rounds being two popular examples here .
7 Last but not least, always use caution when routing out anything regardless if it’s large or small! Wear safety goggles whenever possible while also following all machine manufacturer instructions closely as these power tools can cause serious injuries if not handled correctly !
4. How do I set up my router for my project?
Answer: Setting up your router for a project can be intimidating, but it doesn’t have to be! Here are some easy steps to help you get your router set up for success:
Start by turning off the power. Make sure that both the modem and the router are unplugged from power sources before beginning.
Read through your Router & Modem Manuals. This will give you detailed instructions on how to connect and configure each device correctly so that they work together as intended.
Ensure all cable connections are secure and tight by using crimp tools or other methods appropriate depending on the type of cabling used (coaxial, RJ45, etc).
Configure settings by connecting an Ethernet cable between each device, then use your web browser or 3rd party software to update settings such as IP address assignment, subnet mask setup, DNS server info, DHCP options etc… There may also be settings required specific to your particular network environment and requirements which must be configured accordingly in order for full performance of each device on the network.
Connect any wireless devices such as computers, phones or media streaming boxes & setup their wireless connection with WEP/WPA security enabled (recommended minimum security measure). If you want additional security measures like VPN access available via the router then this should also be configured during this step if applicable.
Test & Validate Setup: once all settings have been updated & saved it is time to test our connectivity on individual devices connected directly or wirelessly ensuring stability of both internet access along with local networking services desired such as file sharing/transferring applications (ie AirDrop), cloud storage services if relevant etc…
Enjoy Your Project! Now sit back enjoy all those components working together seamlessly while knowing now that they were securely setup providing peace of mind against potential cyber threats down-the-road due to proper configuration...Go ahead Feel Proud :D
5. How do I use a router to create decorative edges on my project?
Answer: If you're looking to take your DIY projects to the next level, a router is a great tool for creating decorative edges that can really elevate the look of any piece. Using a router effectively is not as hard as it looks; there are just some basic tips and tricks worth considering first. One of the most important things to pay attention to is the depth of your cuts - make sure your bit size is appropriate for the material you're working with and set the right depth. After that, all you need to do is carefully guide the router along your line, making sure to keep it steady and at a consistent speed. With a little practice, you'll be creating stunning pieces with shaped edges in no time!
6. How do I use a router to create raised panels on my project?
Answer: Looking to step up your DIY game? Raised panels can be the perfect accent item to make your project stand out. Creating these ornamental elements is easier than you think with the help of a router. First, determine where you want the raised panel, then measure and mark that spot accordingly. Use router bits of the right size and shape for the job at hand, setting the router at a depth that is slightly less than twice your material's thickness in order to achieve an optimal fit. With a steady guide and some experience, turning ordinaries pieces into extraordinary works of art will be a breeze!
7. How do I use a router to create molding and trim on my project?
Answer: Working with a router is the perfect way to add intricate detail and beautiful shape to your project! Whether you’re doing a weekend DIY project or a professional grade job, mastering the use of molding and trim with a router can take your creation to the next level. With careful planning and some practice, you’ll be creating stunning results in no time, from delicate details on picture frames to complex designs on bookcases. Working with wood has never been so rewarding; grab yourself a router today, and start bringing shape to your vision!
8. What are some safety tips I should follow when using a router?
Answer: Keeping yourself safe while using a router is incredibly important! First things first, be absolutely sure to read through the user manual thoroughly before beginning any work. It’s also crucial that you keep your router away from moisture, high temperatures, and dust. Additionally, never leave the router unattended or connecting onto an unsecured network unless necessary. Lastly, double check the power supply and its wiring to make sure that everything is properly configured and connected. Following these tips will seriously reduce the chances of any potential injury or damage to your router!
9. Where can I find more information on using routers for woodworking projects?
Answer: If you’re looking for some hot router tips for your woodworking projects, you’ve come to the right place. There are a ton of comprehensive resources available online that will walk you through every step of the process. A great starting point is YouTube, where dozens of experienced carpenters post videos on how to get the most out of using routers. You can also find detailed articles from many popular magazines and websites containing useful material such as specifications and reviews. If you’re looking for specific tips, do an online search to find helpful blogs and discussion groups, where community experts share their experiences with routers and offer advice on related topics. Whatever your needs are, take advantage of this modern woodworker's paradise!